
In AI Strategy Studio, our AI makes setting up your entry and stop loss simple, fast and accurate: you can use smart entry zones and pivots from 4CastMachine AI or ask the AI Trading Assistant to build the entry and stop loss setups for you. Every strategy begins with these two foundation setups: an entry setup (one entry in a single-side strategy, or a buy entry and a sell entry with one-click mirror creation in a two-sided strategy) that watches the chart for your condition, and a stop loss setup that defines your maximum trade risk (1R). Once your stop loss is set, AI Strategy Studio calculates R-multiple take profit targets and your position size from your risk automatically.
Example: on EURUSD (1h timeframe), you build a buy entry setup that waits for price to enter the 1h Buy zone with a bullish Hammer (Hammer) or Engulfing (bullish Engulfing) candle, create its mirrored sell entry with one click, and pair it with the default stop loss at 10% of ATR(264, D) plus the spread behind the 4CM-AI pivot.
Choose or build an entry setup from the setup list
Click St. Studio in the top toolbar to open AI Strategy Studio on the Build tab.
Click the blue Entry part in the strategy sentence to open the entry setup selection list (click ‹ The strategy at the top of this page anytime to return to the full strategy sentence).
Click a saved setup in the list to replace the current setup, click the pencil icon to edit the current setup, or click + New Entry setup to build a new one.
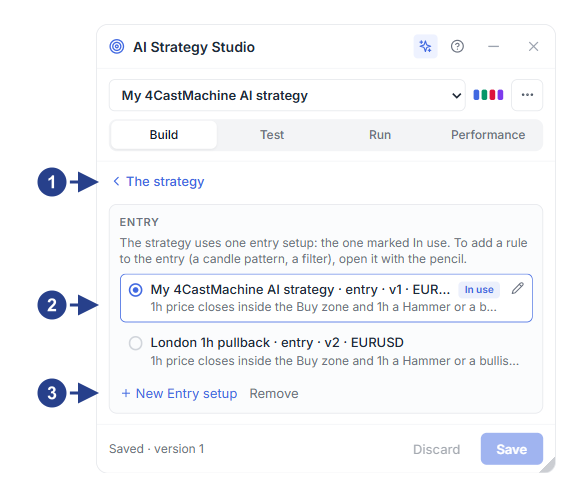
The ‹ The strategy back button to return to the full strategy sentence
List of saved setups with the In use badge and edit pencil icon
The + New … setup button to build a new setup
Once the entry setup window opens, configure your entry conditions and optional second side:
In the entry setup editor window, set your 4CM-AI forecast conditions (such as entering the
Buy zoneorSell zone), candlestick patterns (Hammer, Shooting Star, Engulfing, Pin Bar or Doji), line or level breakouts with a healthy candle, or indicator conditions, and click Save.For a two-sided strategy, click the dashed + Sell entry (or + Buy entry) button and click Make the sell entry as its mirror to generate the opposite sell setup automatically.
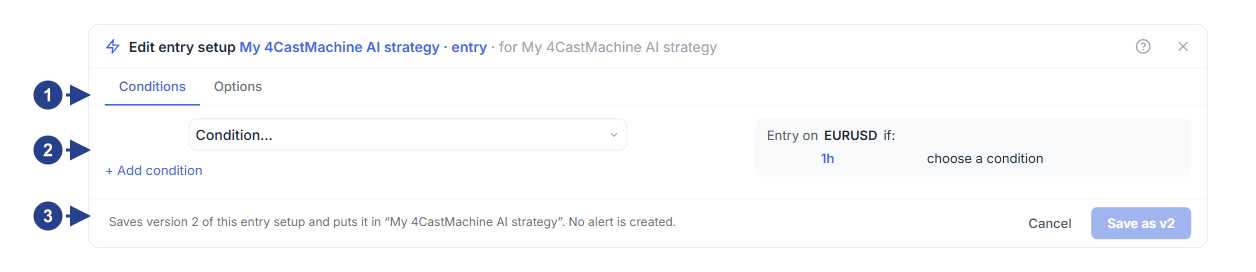
The Conditions and Options tabs in the entry setup window
Condition builder section (4CM-AI zones, candlestick patterns, breakout with a healthy candle or indicators) and + Add condition
The Save button to update the entry setup in your strategy
Set your stop loss level, ATR(264, D) buffer and trend-break exit
In the Build tab, click the red Stop Loss part and configure the Stop row in the stop loss setup window:
4CM-AI pivot (default): places the stop loss behind the support pivot (on buy trades) or resistance pivot (on sell trades) of the 4CastMachine AI forecast.
Distance: a fixed distance in pips, price, percentage or a multiple of the daily average range ATR(264, D).
ATR × k: an ATR multiple (such as
1.5 × ATR 14) or the daily average rangeATR(264, D).Recent low / Recent high: the lowest low or highest high of the last
Nclosed candles.Fixed price: a fixed price level on the active chart symbol.
In the Buffer row, you can add a safety margin beyond the level. On new 4CM-AI pivot setups, this buffer defaults to
10%of dailyATR(264, D)with plus the spread ticked so the symbol's spread does not trigger your stop early.In the Exit dropdown, choose when price touches it or when a candle closes beyond the level.
Under Close at a loss when, click + Add a condition to add an early emergency exit before price reaches the stop loss line, including the trend breaks against the trade (
trendEnd), which closes the position for a smaller loss if market structure breaks or theSMA 20trend turns against the trade.Check the Preview on this chart box on the right to see the exact stop loss price and
1Rdistance in pips, and save the setup.
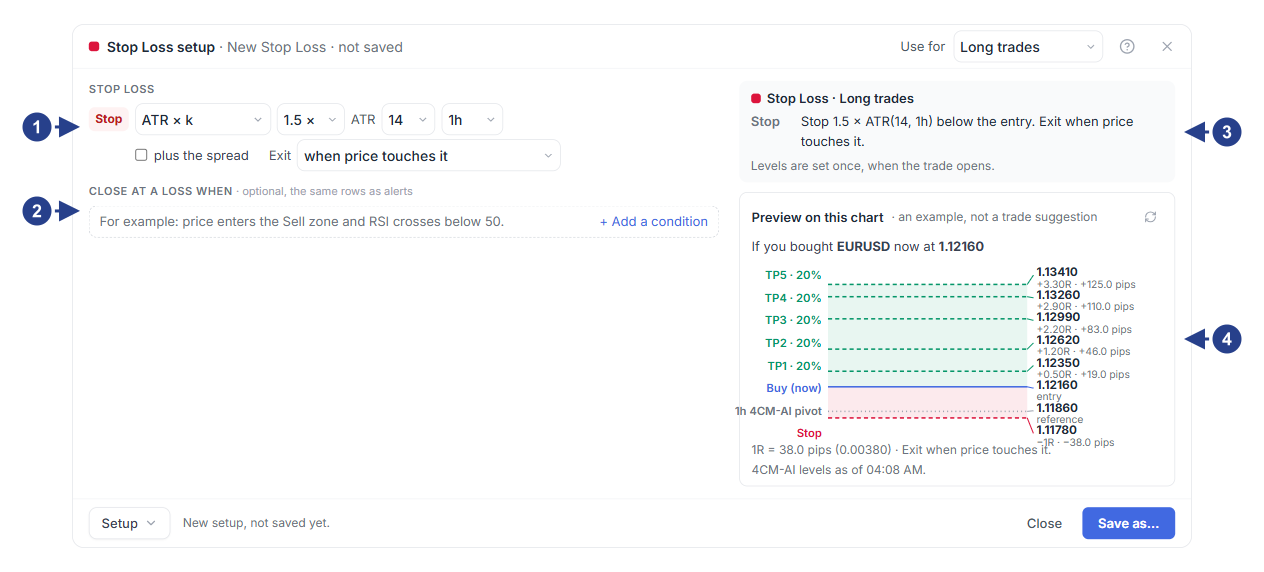
Stop loss method selector (default 4CM-AI pivot), Buffer margin and Exit mode
Optional Close at a loss when section for adding an early exit condition (including trend break
trendEnd)Plain-language summary card of the stop loss rule at the top of the right column
The Preview on this chart box showing the sample entry, stop loss level and
1Rdistance
Good to know
The distance between your entry price and stop loss level defines 1R (one unit of risk). Every R-multiple target in the take profit setup and your position size in the risk section are calculated from this distance.
In the Build tab, you can move your mouse over the ⇕ handle on the red stop loss line to adjust it directly on the chart.