
Every trading platform gives you two ways to enter or exit a market: execute right now at the live price with a Market Order, or leave a pending instruction at a future price level using a Limit Order (Buy Limit, Sell Limit) or a Stop Order (Buy Stop, Sell Stop). While every trader must understand how all five order types work on a chart, knowing their mechanics also reveals one of the biggest traps in retail trading: why leaving a blind Buy Limit or Sell Limit order inside your trading terminal to enter automatically at a support or resistance zone is dangerous: and why official 4CastMachine AI strategies in AI Strategy Studio always wait for an initial rejection and a closed reversal candlestick pattern before entering.
The core distinction in one sentence: A Market Order prioritizes immediate execution right now; a Limit Order asks for a better (cheaper) price expecting a bounce; and a Stop Order triggers only when price breaks through a level in the direction of momentum.
Step 1: Market Orders: immediate execution after confirmation
When you select Market Execution and click Buy or Sell, you tell your broker or exchange: "Fill my position right now at the best currently available price in the order book."
- Market Buy: Fills immediately at the current Ask price.
- Market Sell: Fills immediately at the current Bid price.
When professional traders use a Market Order: Suppose EUR/USD enters a 4CastMachine AI Buy zone (1.0845–1.0850), rejects the lower boundary, and closes a textbook Hammer or Bullish Engulfing candle at 1.0852 during the London session. Because the rejection is already confirmed and liquidity is deep, clicking Market Buy puts you into the trade immediately without missing the wave.
Step 2: The 4 pending orders explained on the chart
Beginner traders frequently confuse Buy Limit with Buy Stop, and Sell Limit with Sell Stop. The secret is to look at where your pending order sits relative to the current market price and whether you expect price to reverse (Limit) or continue breaking through (Stop). Study the four panels below:
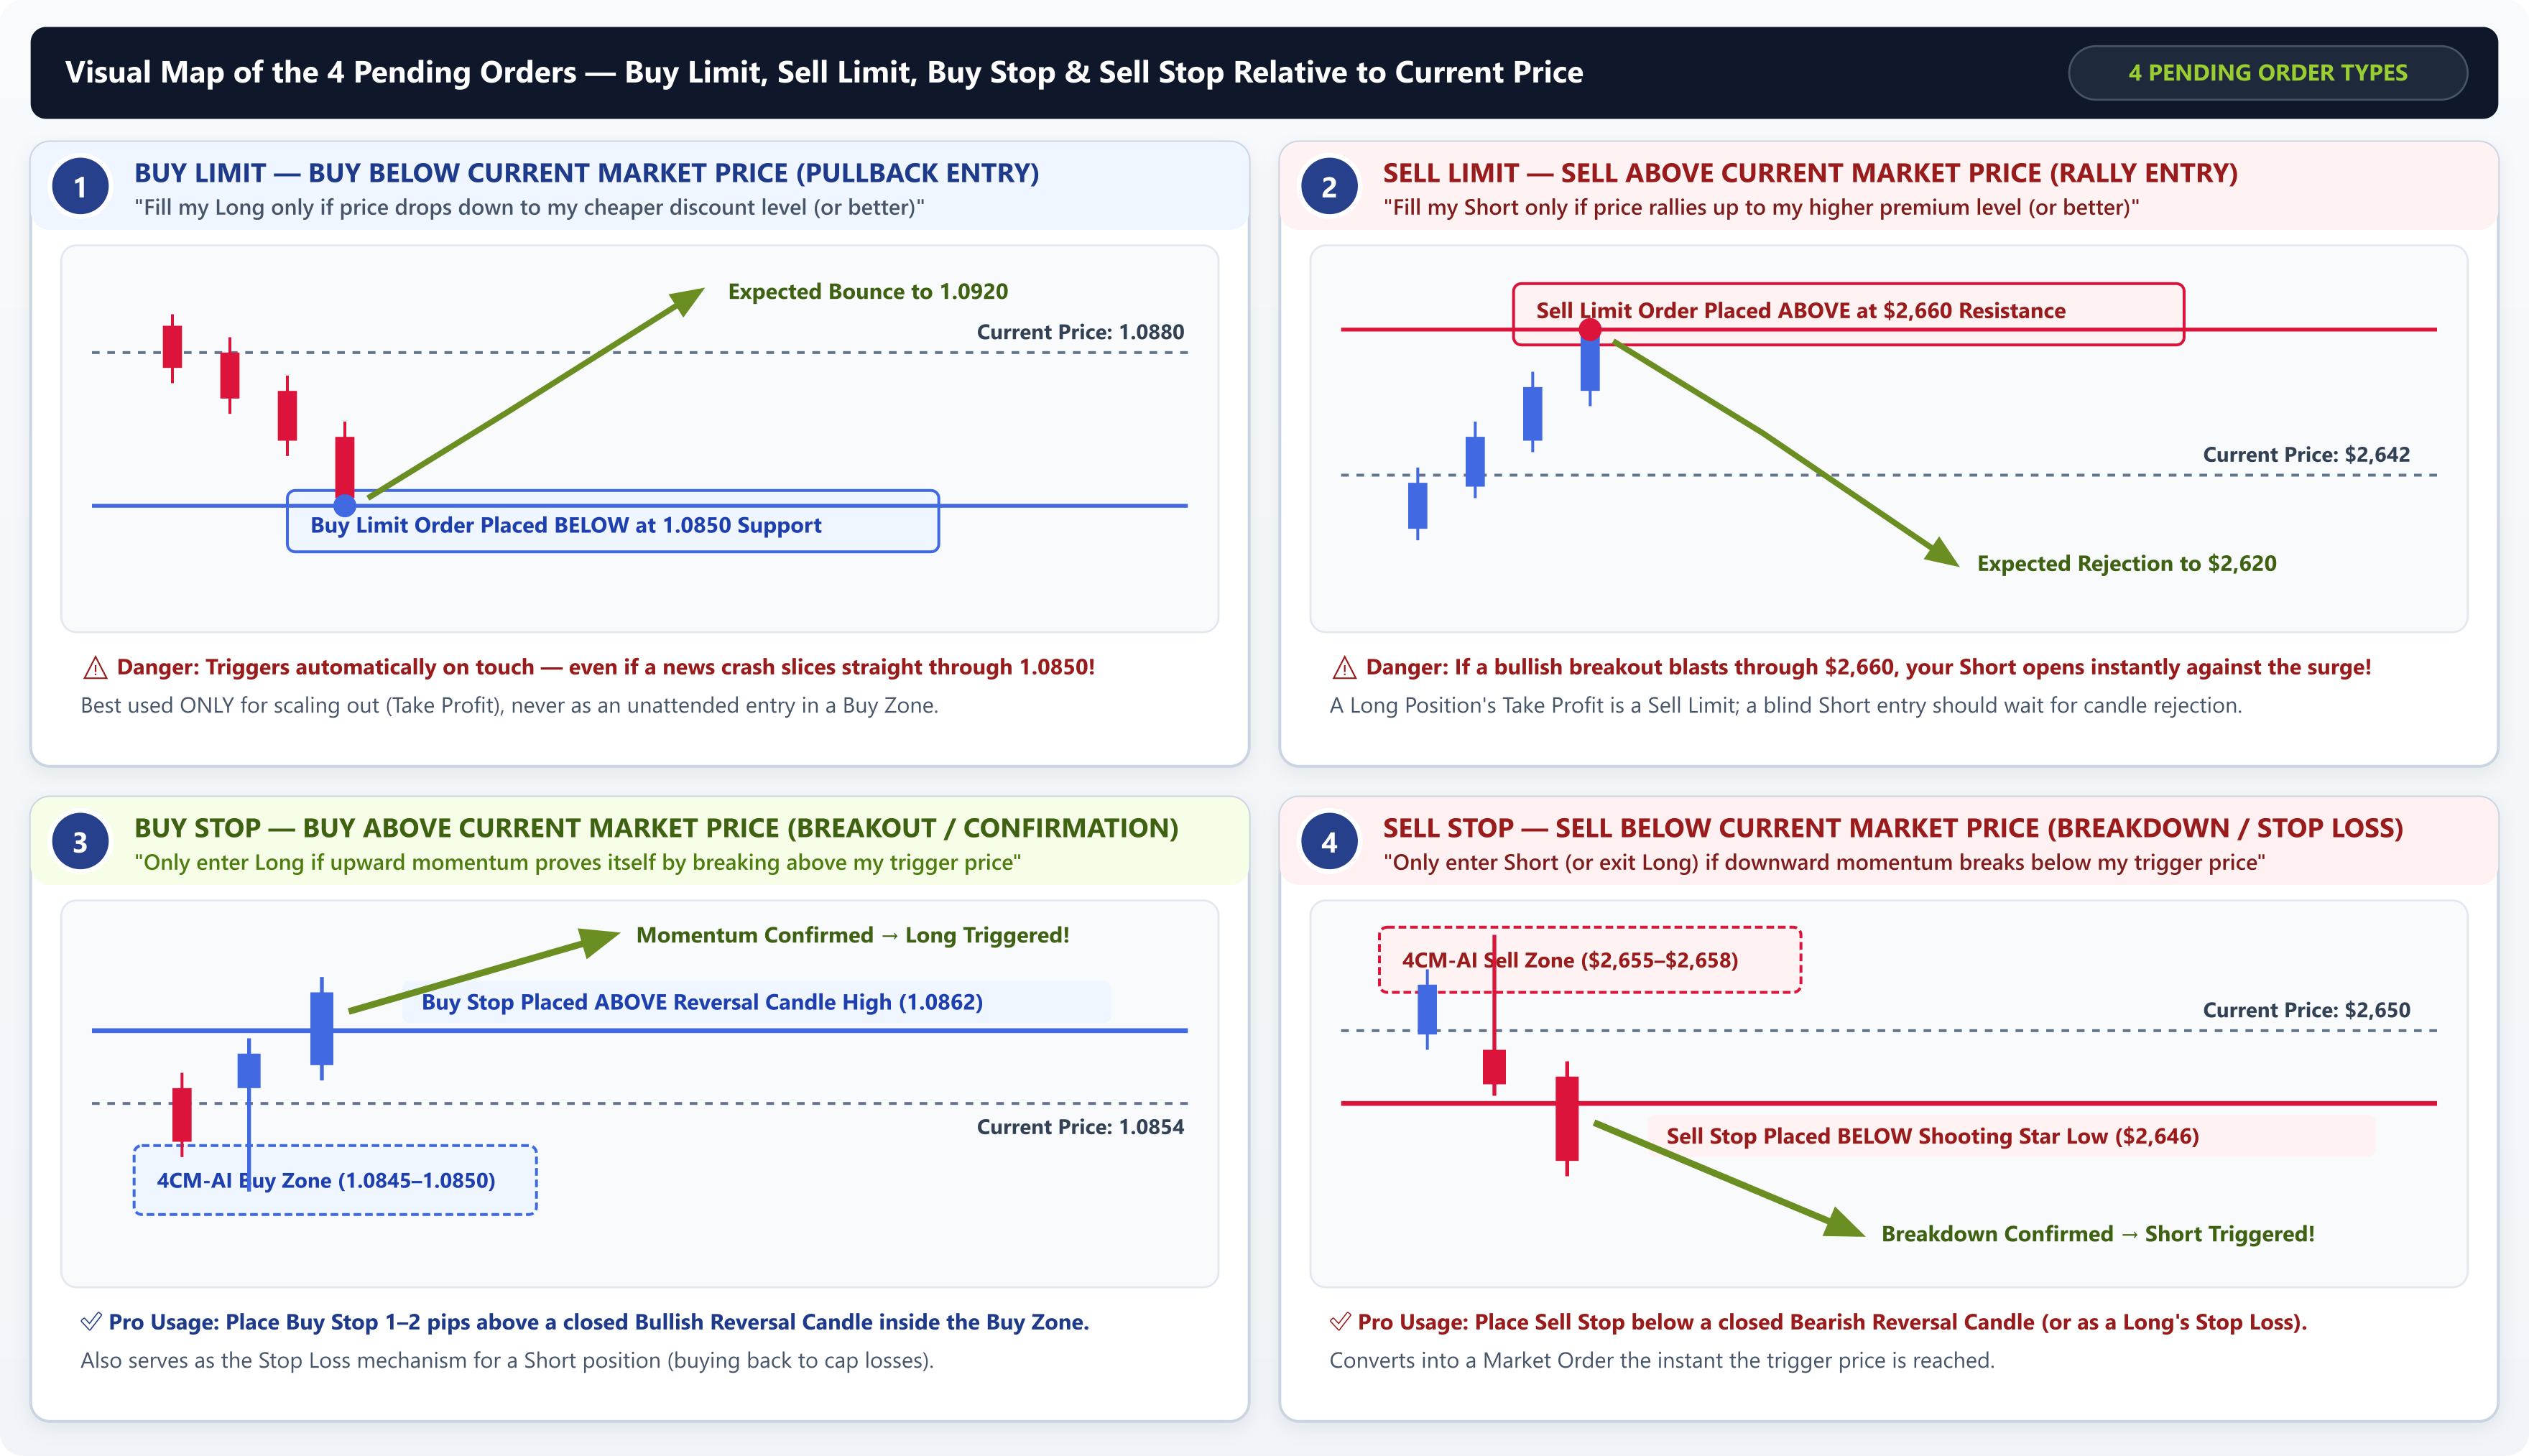
- Buy Limit: Placed BELOW Current Market Price: Currently
EUR/USDis trading at1.0880. ABuy Limitplaced below price at1.0850says: "If price drops down to1.0850(or lower), buy for me at that cheaper price." Notice that a Short trade's Take Profit is also aBuy Limitorder sitting below price to lock in gains. - Sell Limit: Placed ABOVE Current Market Price: Currently Gold (
XAU/USD) is trading at$2642.00. ASell Limitplaced above price at$2660.00says: "If price rallies up to$2660.00(or higher), sell for me at that premium price." A Long trade's Take Profit is aSell Limitorder sitting above price to cash out your profit into strength. - Buy Stop: Placed ABOVE Current Market Price: Currently
EUR/USDis at1.0854after forming a bullishHammercandle inside the Buy zone whose high is1.0860. ABuy Stopplaced above price at1.0862says: "Do not buy yet; only trigger a Market Buy if upward momentum proves itself by breaking above1.0862." A Short trade's Stop Loss is also aBuy Stopsitting above price. - Sell Stop: Placed BELOW Current Market Price: Currently Gold is at
$2650.00after forming a bearishShooting Starcandle inside the Sell zone whose low is$2647.00. ASell Stopplaced below price at$2646.00says: "Only trigger a Market Sell if sellers prove their strength by breaking below$2646.00." A Long trade's Stop Loss is also aSell Stopsitting below price.
Step 3: Why you should avoid blind Buy Limit and Sell Limit entries
Many old trading books tell beginners: "Just place a Buy Limit at support or a Sell Limit at resistance, go to sleep, and let the software open your trade." In real live markets, placing blind Buy Limit or Sell Limit orders in your trading terminal is one of the fastest ways to take unnecessary losses.
Here is why a blind limit order is so dangerous:
- A Limit Order is completely blind to momentum: When you place a pending
Buy Limitat$2648.00inside a Gold support zone, your trading software only checks one condition: did the Ask price touch$2648.00? It cannot tell whether price drifted down gently and bounced, or whether price is crashing at 100 miles per hour. - Technical breakdowns and fundamental news spikes slice right through: Sometimes a support or resistance zone simply fails to hold price: either because a heavy institutional sell wave builds technical momentum, or because a high-impact fundamental news event (such as
CPIinflation,NFPjobs data, or a central bank announcement) fires a giant redMarubozucandle straight through the zone. - Instant opening into instant drawdown: When price blasts through the zone at high speed and the zone does not stop the move, a pending
Buy Limittriggers automatically mid-crash, opens your Long trade against a runaway bearish wave, and slams straight into your Stop Loss seconds or minutes later.
Compare the two panels in the diagram below to see the difference between a blind Buy Limit order and the official 4CastMachine AI confirmation workflow:
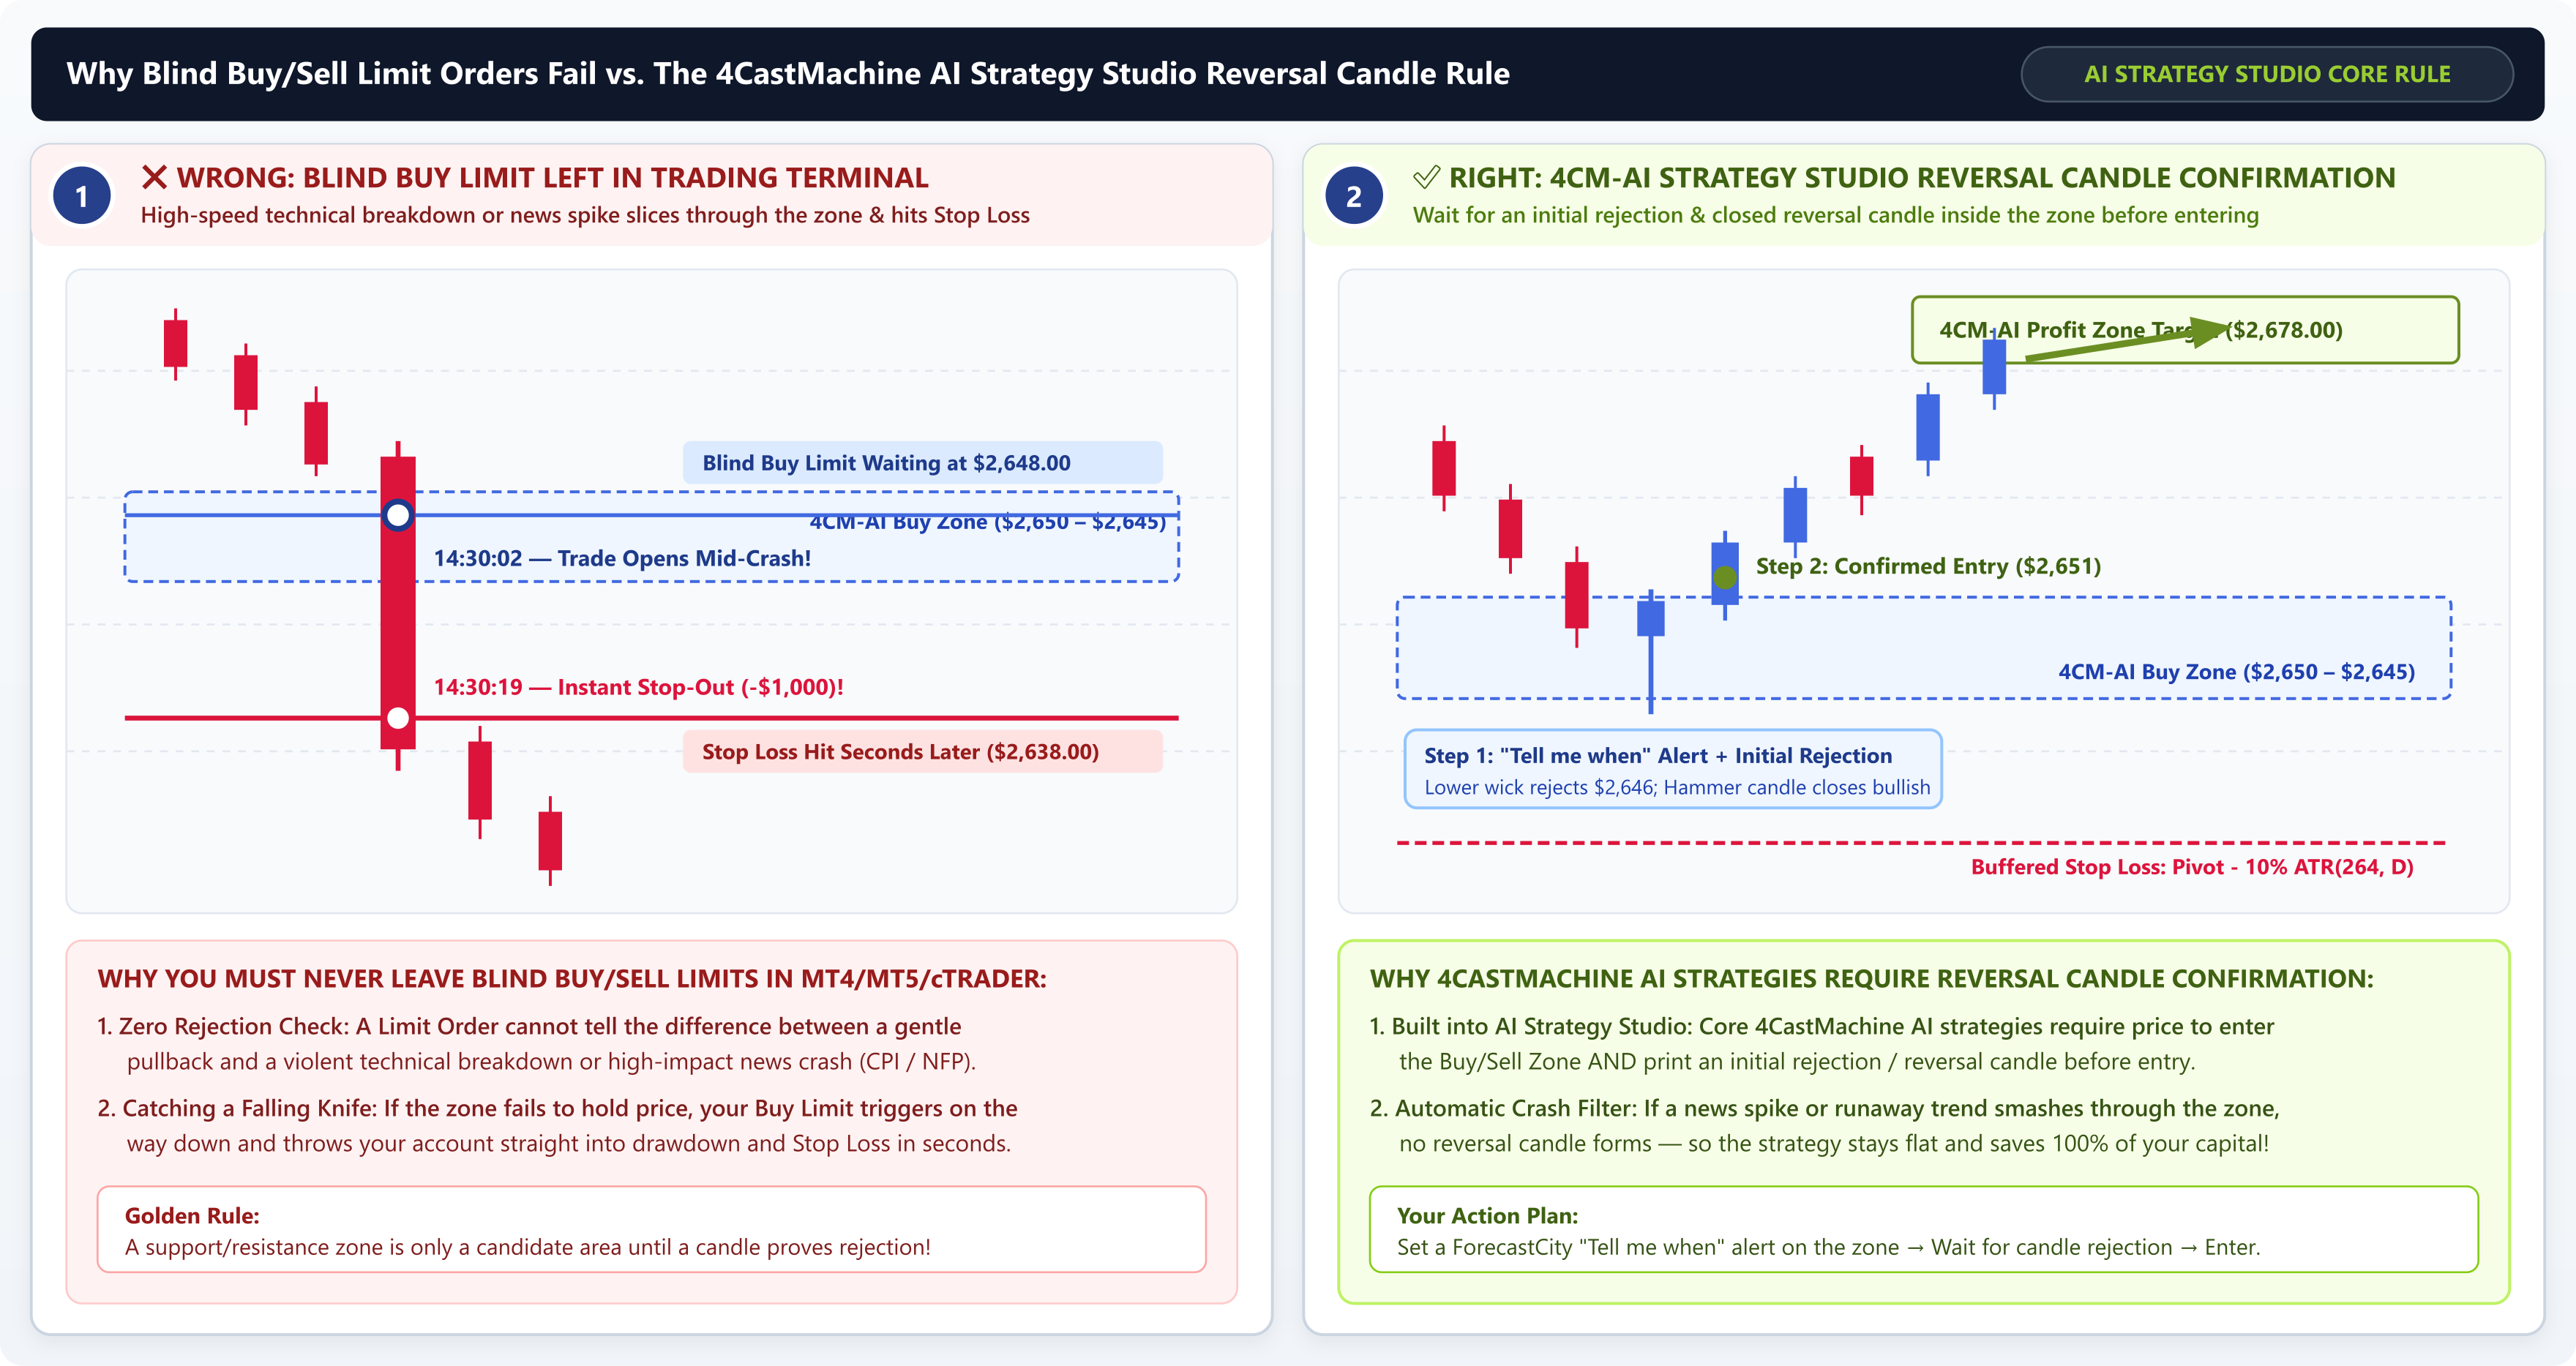
- The Blind Buy Limit Trap (Panel 1): A trader leaves a pending
Buy Limitat$2648.00inside the Buy zone with a Stop Loss at$2638.00. At14:30, a sharp bearish wave (technical breakdown or news spike) smashes straight through the zone without pausing. At14:30:02, theBuy Limitfills automatically at$2648.00; by14:30:19, the same candle slices through$2638.00, locking in a full-$1000Stop Loss before the trader can even react. - The 4CastMachine AI Strategy Studio Reversal Candle Rule (Panel 2): In the core 4CastMachine AI strategies inside AI Strategy Studio, a support or resistance zone is never traded on a blind touch. The strategy requires an initial price rejection and a closed reversal candlestick pattern (such as a
Hammer,Shooting Star,Bullish/Bearish Engulfing,Piercing Line, orDark Cloud Cover) inside the zone before opening the trade. If a fast breakdown or news candle slices straight through the zone without printing a reversal candle, no trade is opened and100%of your capital stays safe.
Practical rule for every ForecastCity trader: use "Tell me when" alerts instead of blind Limit entries:
1. Never leave unattended Buy Limit or Sell Limit entry orders sitting inside a zone in MetaTrader, cTrader, or TradingView.
2. Instead, click the bell icon on 4CM-AI Charts and set a Tell me when alert for when price enters the Buy zone or Sell zone.
3. When the alert notifies you, watch how price behaves inside the zone: wait for at least a small initial rejection and a closed reversal candle (Hammer, Shooting Star, or Engulfing), then enter via a Market Order or a confirmation Buy Stop / Sell Stop placed 1–2 pips beyond that reversal candle.
Step 4: Summary table: when to use (and avoid) each order type
| Order Type | Position relative to live price | Execution price | Professional use case in 4CastMachine AI |
|---|---|---|---|
| Market Buy / Sell | At live price | Buy at Ask / Sell at Bid |
Primary entry tool immediately after a reversal candle closes inside a Buy zone or Sell zone. |
| Buy Stop | Above current price | Fills at Ask once broken |
Confirmation entry placed 1–2 pips above the high of a closed bullish reversal candle, or as a Short trade's Stop Loss. |
| Sell Stop | Below current price | Fills at Bid once broken |
Confirmation entry placed 1–2 pips below the low of a closed bearish reversal candle, or as a Long trade's Stop Loss. |
| Buy Limit / Sell Limit | Buy Limit below / Sell Limit above | Specified limit price or better | Use for Take Profit targets (TP1–TP5) to scale out automatically. Avoid using as blind unattended zone entries. |
Next up in Lesson 1.5: Leverage, Used Margin, Free Margin & The 50% Stop-Out Mechanism, we demystify account leverage with step-by-step numbers so you never confuse leverage with position risk or fall victim to a broker Stop-Out.