
You will give an alert a useful message and, if you use an external service, set up its webhook.
Before you begin
Build the condition first. For a webhook, have your receiver's public endpoint ready and check that your account has webhook access and enough credits. The editor accepts http or https addresses on ports 80 and 443. Localhost and private network addresses are not supported.
1. Write the shared message
Open the Options tab and click the Message row. It is closed by default and shows Auto, because most alerts do not need their own words.
For an illustrative EURUSD level of 1.1000, a useful message names the instrument, what happened and when:
EURUSD level review: {{symbol}} at {{price}}. {{condition_text}}. Time: {{time_iso}}.Keep it within the field's limit. Leaving it blank uses the automatic message, which already names the symbol, the condition and the price, and writes a rule with several conditions with the same parentheses the editor draws. The message is also how the alert is labelled in the list.
An alert has one message and every ticked destination uses it. The webhook body below is a separate thing: a payload for a machine, not a sentence for a person.
2. Use the variables that exist
Open Available variables under the field and copy the exact spelling, double braces included.
Use {{symbol}} for the instrument, {{condition_text}} for a readable condition, {{timeframe}} for the timeframe and {{alert_url}} for a link back. {{time_iso}} is a UTC date and time, which can look different from the clock on your screen.
For a 4CM-AI alert, {{forecast_summary}}, {{forecast_cycle}} and {{forecast_symbol}} help identify the event. {{price}} and {{close}} describe market prices; do not use them to suggest that a combined forecast alert had one execution price.
The list also holds {{name}}, {{condition}}, {{exchange}}, {{status}}, {{time}} and {{time_now}}. A name that does not exist stays on the page exactly as you typed it, so a misspelled {{prices}} never becomes a price.
3. Start with the default webhook body
Under Notifications, tick Webhook URL and paste your receiver's endpoint. Choose Raw JSON and leave the body blank.
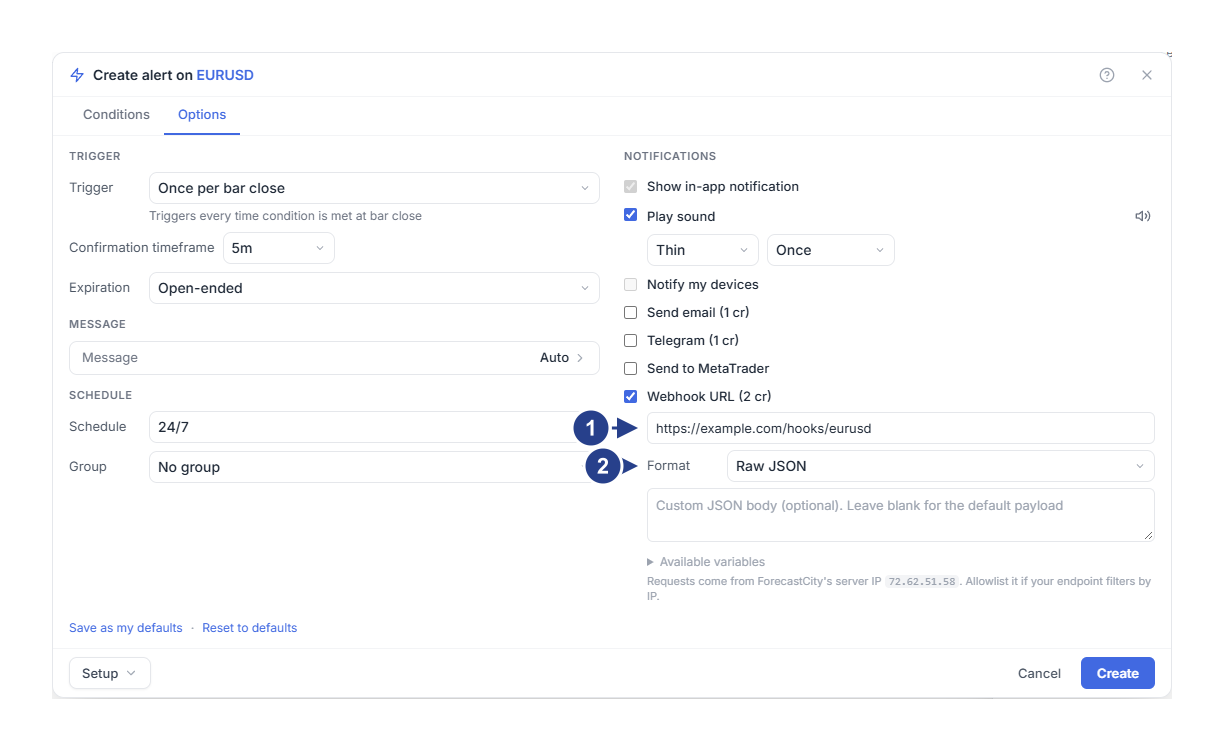
The address your receiver listens on. Ports 80 and 443 only.
Format: raw JSON, or a shape Discord and Slack render.
That sends a structured payload with the alert and trigger identifiers, which is a good starting point when the receiver stores events. Look at a real payload before you build a process that depends on its fields.
Requests come from one ForecastCity server address, printed under the field. Add it to your allowlist if your endpoint filters by address.
4. Customize the format when you need to
For a receiver that expects a small object, enter:
{"symbol":"{{symbol}}","condition":"{{condition_text}}","time":"{{time_iso}}","source":"ForecastCity"}Substitution is textual. If a value can contain quotation marks or line breaks, use the default payload or handle it in your receiver. A custom body that is not valid JSON is sent as plain text.
For a Discord incoming webhook, choose Discord and write a short line instead:
Review {{symbol}}: {{condition_text}}. Open the alert: {{alert_url}}.For Slack, choose Slack and write in the same style. Both formats wrap your text for the service. Leave the box blank to use their default.
5. Save and compare the result
Save the alert. At the next event, compare the symbol, the condition and the time your receiver got with the entry in Log. If braces are still visible or the receiver rejects the body, reopen the editor and check the variable names and the JSON.
Continue with choosing destinations or finding why an alert stayed quiet.