
Three settings decide when an alert may reach you and when it stops: Trigger, Expiration and Schedule. They all live on the Options tab: trigger and expiration at the top of the left column, the schedule under the message.
The example below watches an illustrative EURUSD level of 1.1000 with fifteen-minute confirmation, during weekday hours, for one week.
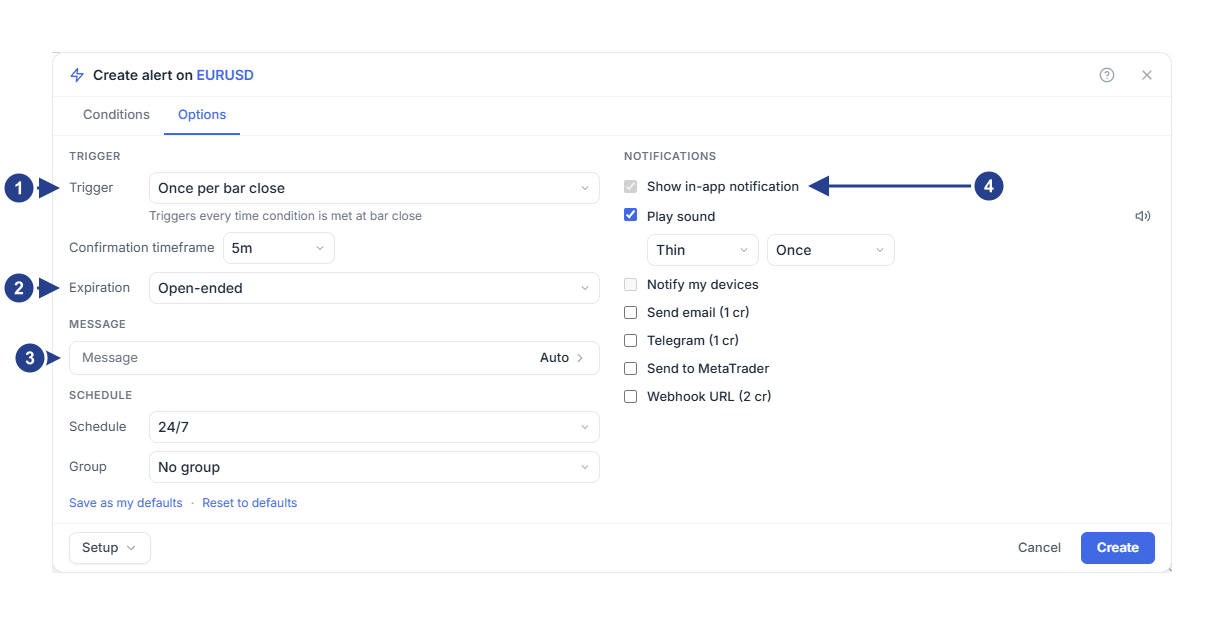
Trigger: how often this alert may fire. The line under it explains the choice.
Expiration: keep it open-ended or give the alert an end date.
Message: closed, because most alerts do not need one. Leave it blank for the automatic message.
Notifications: in-app is always on. Tick the other destinations you want.
1. Choose the confirmation timeframe
Set the condition row's timeframe to 15m, and set Confirmation timeframe to 15m as well while you are learning the controls. The confirmation field appears for bar triggers and for a zone condition that waits for a candle to close inside.
In an alert with 4CM-AI rows, each forecast row chooses its own forecast timeframe. A 4h forecast row with a 15m confirmation watches the 4h forecast and uses fifteen-minute timing to confirm. Changing the confirmation does not turn that row into a 15m forecast.
2. Select the trigger
Choose Once per bar close for this example. The line under the dropdown describes whichever choice is selected.
Once only: stop after the first qualifying trigger. Good for a single review of a level.
Once per bar: at most one trigger per bar of the confirmation timeframe. Good when you want to hear about it inside the bar but only once.
Once per bar close: judge the event on the completed bar, so a visit that disappears before the close is not enough.
Once per minute: keep at least a minute between triggers while the condition keeps qualifying.
A frequency never invents an event. A crossing alert is not a reminder every minute because price stayed above the level, and a forecast direction condition has to become false again before it can become true.
Some conditions always need a completed candle, whatever you choose here: a line break, a line bounce, and a zone condition that waits for a candle to close inside.
3. Set the expiration
Choose 1 week for this example. The other choices are Open-ended to keep watching, End of day to finish today, 1 month for a longer review and Custom date for an exact end.
Custom date adds a date and time field that reads your device's local time. Check the value before saving, especially when you work across timezones.
Expiration ends the watch for good. A schedule is different: it closes and reopens while the alert stays saved.
4. Restrict the active hours
In the left column, under Message, change Schedule from 24/7 to Custom hours. Select Mo, Tu, We, Th and Fr, then enter 09:00 AM to 05:00 PM. Read the timezone printed beside the times.
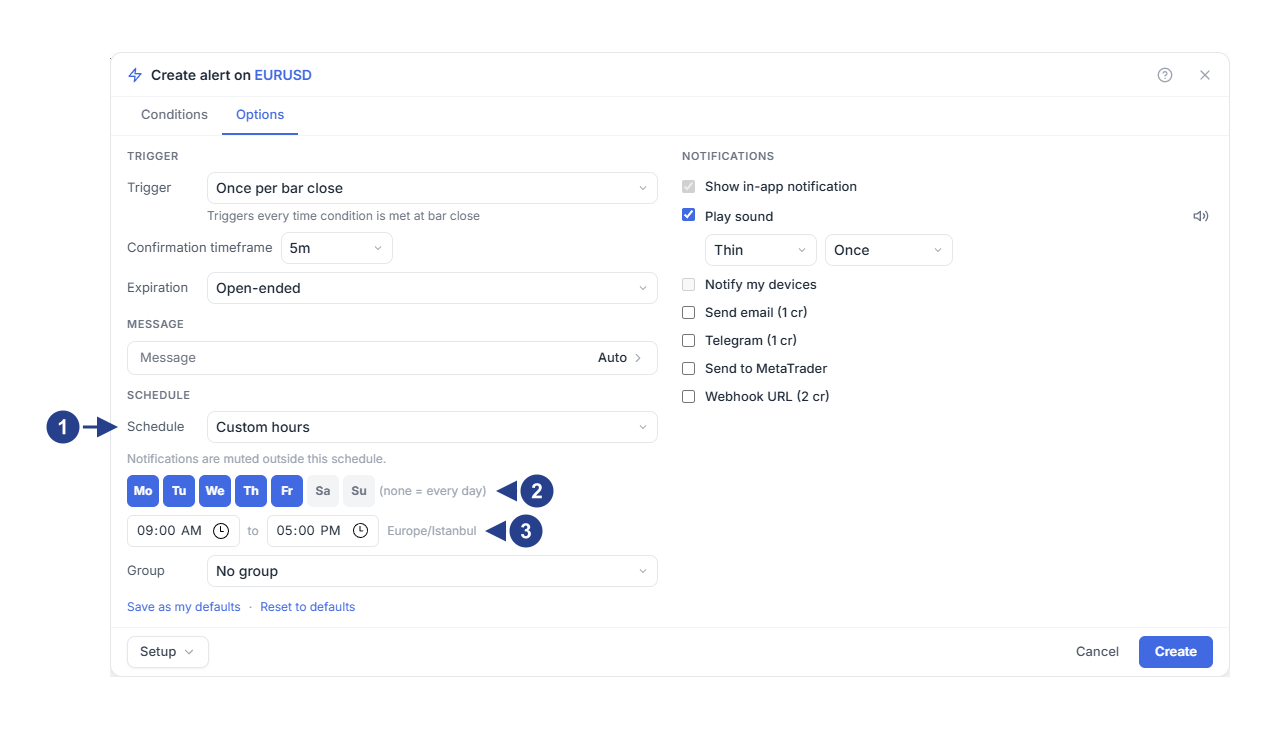
Custom hours turns the schedule on.
Days: no day selected means every day.
The window is read in the timezone printed beside it.
Nothing is delivered outside the window, and events outside it are not queued up for 09:00 AM. For an overnight watch, enter 10:00 PM to 06:00 AM and check the days you selected. Leave 24/7 when you want no restriction at all.
5. Save your answers as defaults
If you set the same trigger, expiration and destinations every time, press Save as my defaults at the bottom of the tab. Every new alert then starts there, while an entry point that knows better still wins: a drawing alert keeps Once per minute, for example. Reset to defaults puts the original values back.
Defaults apply to new alerts only. Opening an existing alert always shows what that alert has saved.
6. Save and check the next event
Save, reopen the alert and check the Options tab. At the next event, compare the time in Log with the timeframe and the active hours you chose.
If nothing arrived, check in this order: did the condition actually complete, has the watch expired, is its group muted, and is the destination connected. Continue with manage alerts or troubleshooting.