
You will choose how one alert reaches you, then check the connection for each destination. Use this guide after you have built the condition.
Before you begin
Sign in and open an alert in 4CM-AI Charts. Which destinations you see depends on your account. Email, Telegram and webhook delivery use credits, and the cost is printed beside the name.
Everything here lives on the Options tab: the destinations under Notifications on the right, the schedule and the group under Message on the left.
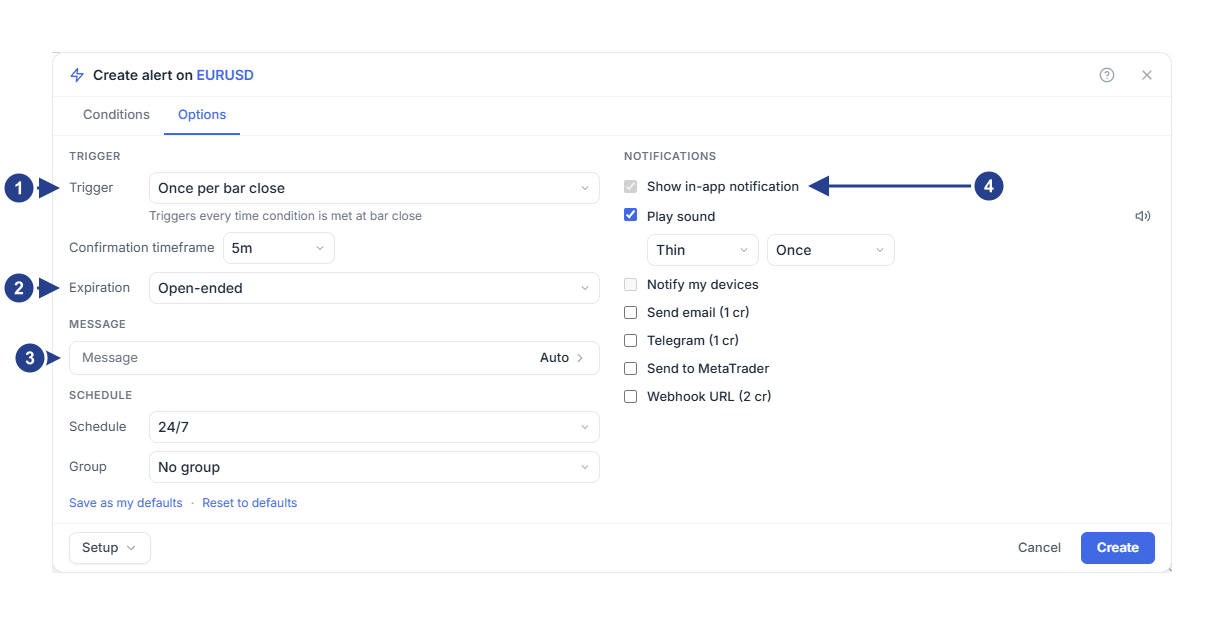
Trigger: how often this alert may fire. The line under it explains the choice.
Expiration: keep it open-ended or give the alert an end date.
Message: closed, because most alerts do not need one. Leave it blank for the automatic message.
Notifications: in-app is always on. Tick the other destinations you want.
1. In-app is always on
Show in-app notification cannot be switched off. It shows the alert while the app is open and it is the copy you can always come back to in Log. Every other destination is an addition, and you can tick several at once.
2. Choose and preview a sound
Tick Play sound, then pick a tone and either Once or a duration. The speaker button beside the row plays it.
The sound plays in this browser only. Previewing it checks your audio; it does not test the condition and it says nothing about whether a phone is connected.
3. Connect this computer and your phone
Tick Notify my devices, then read the line under it. A ticked box is not a connection.
On the computer that should receive notifications, use the connect button and accept the browser prompt. The row then says notifications are allowed on this device.
For your phone, press Connect my mobile, scan the code with the phone camera and follow the page that opens on the phone. Allow notifications there. On an iPhone, follow the extra Home Screen steps shown on that page.
Come back to the computer and check that a connected phone is listed.
Each device grants its own permission. If the row says notifications are blocked, allow this site in that browser's settings and reload the page. If the browser does not support them, use another device or another destination.
If a saved alert carries device delivery while this browser is not connected, the row says so and offers to remove it from the alert. Reconnecting restores it.
4. Add email or Telegram
Send email uses the address on your account, which gives you a second place to read the same message.
For Telegram, tick the row, press Connect Telegram, then use the code or open Telegram directly. Press Start in the bot conversation and come back; the row changes to connected. If the code expires, generate a fresh one in the same dialog.
There is no separate Telegram message. An alert has one message, written under Message, and every destination uses it.
5. Send a popup to MetaTrader
Send to MetaTrader shows a popup in your terminal through the ForecastFollow EA, which has to be running there. The row links to the EA, and to your notification settings so you can switch terminal messages back on.
This is a message, nothing more. Creating a ForecastCity alert never places an order.
6. Set the hours and the group
In the left column, under Message, Schedule is 24/7 by default. Custom hours adds the weekday buttons and a start and end time, read in the timezone printed beside them. Nothing is delivered outside that window and nothing is queued up for later.
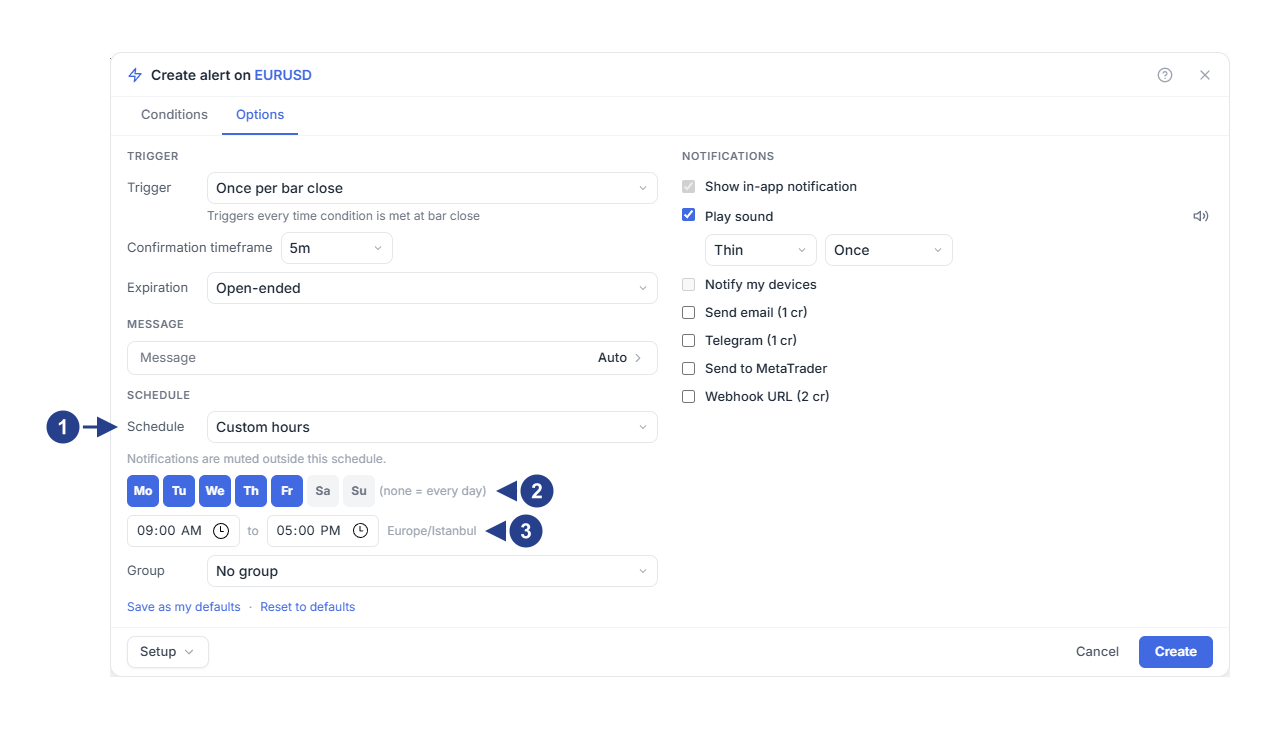
Custom hours turns the schedule on.
Days: no day selected means every day.
The window is read in the timezone printed beside it.
Group, right under the schedule, puts the alert in one of your alert groups, which is how you mute a whole set of watches at once. Groups are managed in Setups & Groups.
7. Save and verify
Press Create or Save, reopen the alert and check the destinations you chose. At the next event, compare the time in Log with what arrived where.
If the log has an entry but a device stayed quiet, check that destination's connection and permissions first: the condition clearly worked. For webhooks, continue with messages and webhooks. For a delivery window, see timing and lifetime.
If you always want the same destinations, press Save as my defaults at the bottom of the tab. New alerts then start with them.